Install HertzBeat via Docker
Using Docker to start HertzBeat with the minimum available environment, no external service dependencies, easy to experience quickly. But it is not recommended to use in production environment, it is recommended to use Docker Compose deployment, installation package deployment, Kubernetes deployment in production environment.
It is necessary to have Docker environment in your environment. If not installed, please refer to Docker official document
Deploy HertzBeat Server
-
Execute the following command
$ docker run -d -p 1157:1157 -p 1158:1158 \
    -v $(pwd)/data:/opt/hertzbeat/data \
    -v $(pwd)/logs:/opt/hertzbeat/logs \
    -v $(pwd)/application.yml:/opt/hertzbeat/config/application.yml \
    -v $(pwd)/sureness.yml:/opt/hertzbeat/config/sureness.yml \
    --restart=always \
    --name hertzbeat apache/hertzbeat
Command parameter explanation
docker run -d: Run a container in the background via Docker-p 1157:1157 -p 1158:1158: Mapping container ports to the host, 1157 is web-ui port, 1158 is cluster port.-v $(pwd)/data:/opt/hertzbeat/data: (optional, data persistence) Important, Mount the H2 database file to the local host, to ensure that the data is not lost due creating or deleting container.-v $(pwd)/logs:/opt/hertzbeat/logs: (optional) Mount the log file to the local host to facilitate viewing.-v $(pwd)/application.yml:/opt/hertzbeat/config/application.yml: (optional) Mount the configuration file to the container (please ensure that the file exists locally). Download-v $(pwd)/sureness.yml:/opt/hertzbeat/config/sureness.yml: (optional) Mount the account configuration file to the container (please ensure that the file exists locally). Download-v $(pwd)/ext-lib:/opt/hertzbeat/ext-lib: (optional) Mount external third-party JAR package mysql-jdbc oracle-jdbc oracle-i18n--name hertzbeat: (optional) Naming container name hertzbeat--restart=always: (optional) Configure the container to restart automatically.apache/hertzbeat: Use the official application mirror to start the container, if the network times out, usequay.io/tancloud/hertzbeatinstead.--network host: (optional) Use the host network mode to start Docker, namely making Docker container and hosting share network.docker run -d --network host .....
tip- Marked as optional parameters, non-mandatory items, if not needed, delete them.
- This maps the 1157,1158 ports of the container to the 1157,1158 ports of the host. If the port on the host is already occupied, you need to modify the host mapping port.
- When mounting files, the first parameter is your custom local file address, and the second parameter is the container file address. Make sure you have this file locally when mounting.
- You can execute
docker update --restart=always hertzbeatto configure the container to restart automatically. - If you want to use the host network mode to start Docker, you can use
docker run -d --network host .....
-
Start to explore HertzBeat
Access http://ip:1157/ using browser. You can explore HertzBeat with default accountadmin/hertzbeatnow!
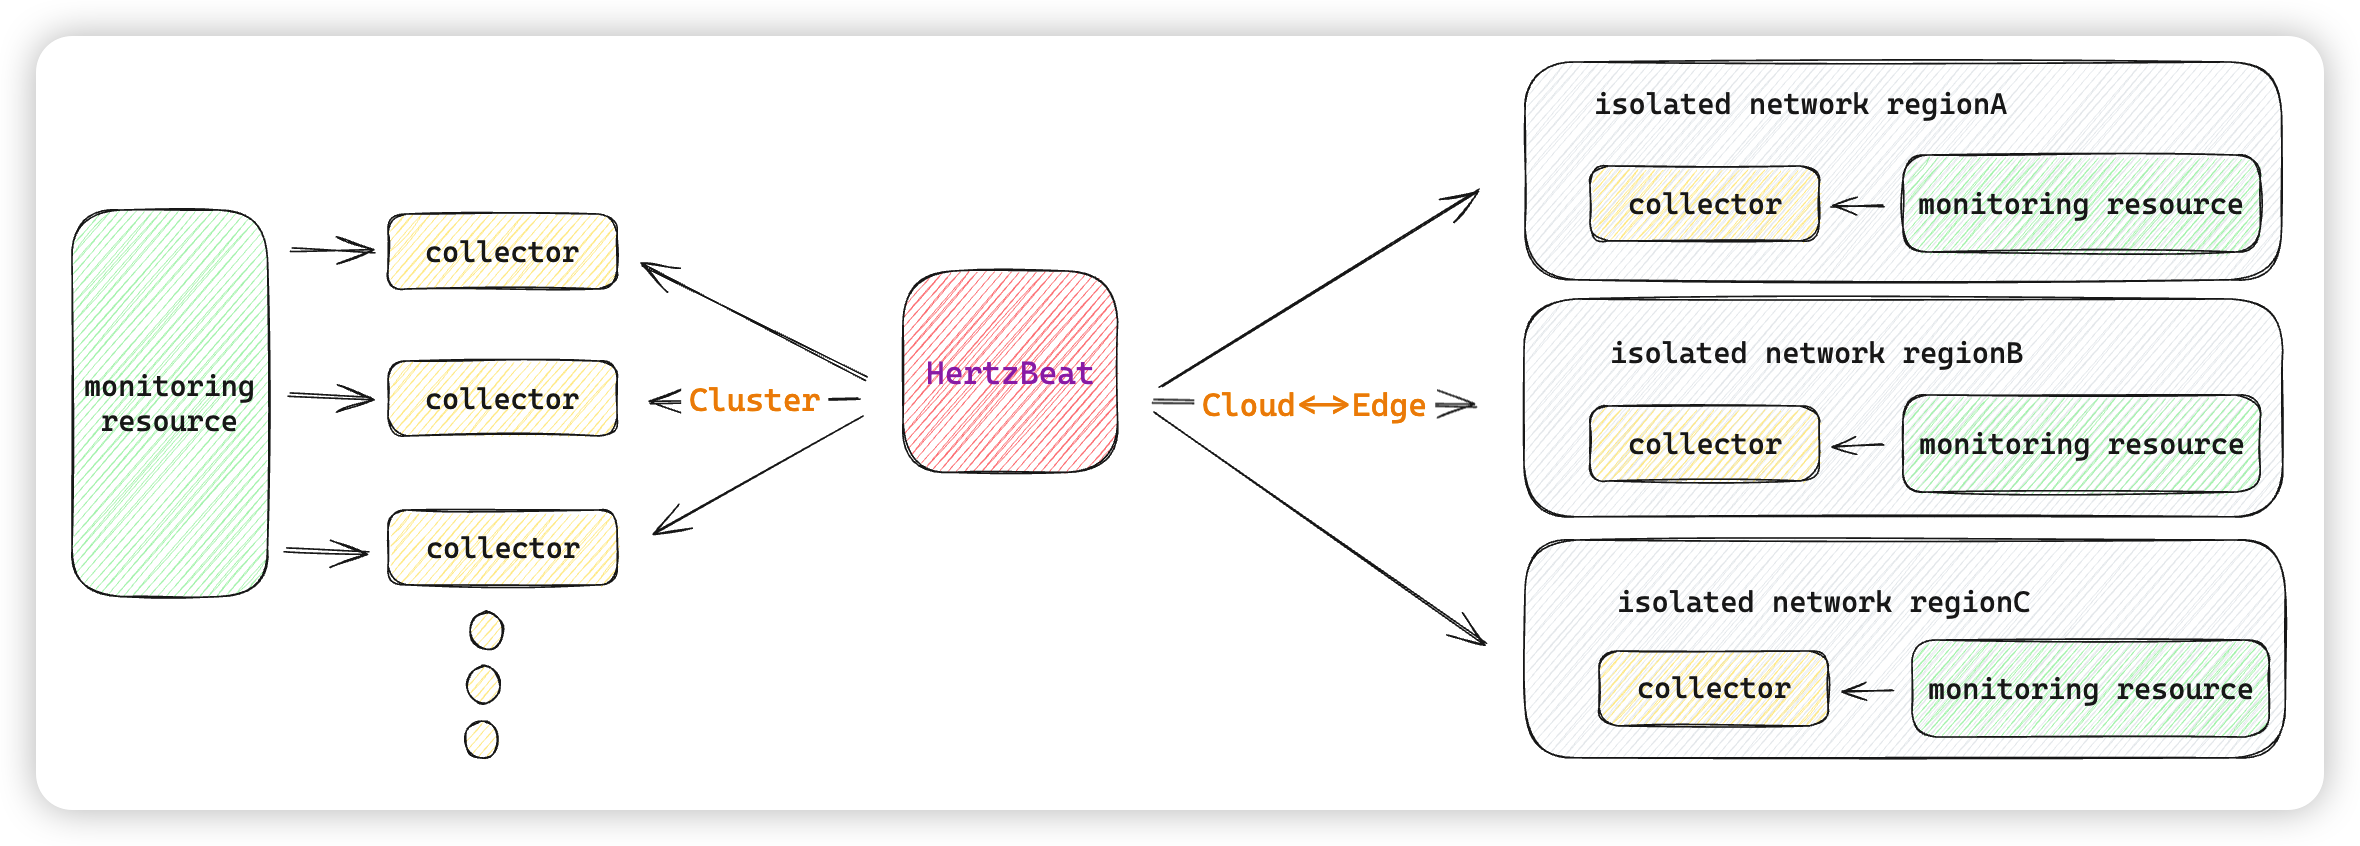
Deploy HertzBeat Collector Cluster(Optional)
HertzBeat Collector is a lightweight data collector used to collect and send data to HertzBeat Server. By deploying multiple HertzBeat Collectors, high availability, load balancing, and cloud-edge collaboration of data can be achieved.
-
Execute the following command
$ docker run -d \
    -e IDENTITY=custom-collector-name \
    -e MODE=public \
    -e MANAGER_HOST=127.0.0.1 \
    -e MANAGER_PORT=1158 \
    --name hertzbeat-collector apache/hertzbeat-collector
Command parameter explanation
docker run -d: Run a container in the background via Docker-e IDENTITY=custom-collector-name: (optional) Set the collector unique identity name. Attention the clusters collector name must unique.-e MODE=public: set the running mode(public or private), public cluster or private-e MANAGER_HOST=127.0.0.1: Important, Set the main hertzbeat server ip host, must use the server host instead of 127.0.0.1.-e MANAGER_PORT=1158: (optional) Set the main hertzbeat server port, default 1158.-v $(pwd)/logs:/opt/hertzbeat-collector/logs: (optional) Mount the log file to the local host to facilitate viewing.--name hertzbeat-collector: Naming container name hertzbeat-collectorapache/hertzbeat-collector: Use the official application mirror to start the container, if the network times out, usequay.io/tancloud/hertzbeat-collectorinstead.--network host: (optional) Use the host network mode to start Docker, namely making Docker container and hosting share network.docker run -d --network host .....
tip- Marked as optional parameters, non-mandatory items, if not needed, delete them.
- The
127.0.0.1inMANAGER_HOSTneeds to be replaced with the external IP address of the HertzBeat Server. - When mounting files, the first parameter is your custom local file address, and the second parameter is the container file address. Make sure you have this file locally when mounting.
- You can execute
docker update --restart=always hertzbeat-collectorto configure the container to restart automatically. - If you want to use the host network mode to start Docker, you can use
docker run -d --network host .....
-
Access
http://localhost:1157and you will see the registered new collector in dashboard.
HAVE FUN
FAQ
The most common problem is network problems, please check in advance
-
MYSQL, TDENGINE, IoTDB and HertzBeat are deployed on the same host by Docker,HertzBeat use localhost or 127.0.0.1 connect to the database but fail The problems lies in Docker container failed to visit and connect localhost port. Because the docker default network mode is Bridge mode which can't access local machine through localhost.
Solution A:Configure application.yml. Change database connection address from localhost to external IP of the host machine.
Solution B:Use the Host network mode to start Docker, namely making Docker container and hosting share network.docker run -d --network host ..... -
According to the process deploy,visit http://ip:1157/ no interface Please refer to the following points to troubleshoot issues:
1:If you switch to dependency service MYSQL database,check whether the database is created and started successfully.
2:Check whether dependent services, IP account and password configuration is correct in HertzBeat's configuration fileapplication.yml.
3:docker logs hertzbeatCheck whether the container log has errors. If you haven't solved the issue, report it to the communication group or community. -
Historical monitoring charts have been missing data for a long time
1:Check whether you configure victoria-metrics or Tdengine or IoTDB. No configuration means no historical chart data.
2: Check whether IP account and password configuration is correct in HertzBeat's configuration fileapplication.yml. -
If the history chart on the monitoring page is not displayed,popup [please configure time series database]
As shown in the popup window,the premise of history chart display is that you need install and configure hertzbeat's dependency service database.
Installation and initialization this database, please refer to Using victoria-metrics to store metrics data -
The time series database is installed and configured, but the page still displays a pop-up [Unable to provide historical chart data, please configure dependent time series database]
Please check if the configuration parameters are correct
Is time-series database enable set to true
Note⚠️If both hertzbeat and time-series database are started under the same host for docker containers, 127.0.0.1 cannot be used for communication between containers by default, and the host IP is changed
You can check the startup logs according to the logs directory -
What is the purpose of application.yml
This file is the configuration file of HertzBeat, used to configure various parameters of HertzBeat, such as database connection information, time series database configuration, etc. Download
application.ymlfile to the host directory, for example: $(pwd)/application.yml Download source github/script/application.yml You can modify the configuration yml file according to your needs.- If you need to use email to send alarms, you need to replace the email server parameters
spring.mailinapplication.yml - Recommended If you need to use an external Mysql database to replace the built-in H2 database, you need to replace the
spring.datasourceparameter inapplication.ymlFor specific steps, see Using Mysql to replace H2 database - Recommended If you need to use the time series database victoria-metrics to store metric data, you need to replace the
warehouse.store.victoria-metricsparameter inapplication.ymlfor specific steps, see Using victoria-metrics to store metrics data
- If you need to use email to send alarms, you need to replace the email server parameters
-
What is the purpose of sureness.yml
This file is the user configuration file of HertzBeat, used to configure user information of HertzBeat, such as account password, etc.
HertzBeat default built-in three user accounts, respectivelyadmin/hertzbeat tom/hertzbeat guest/hertzbeat
If you need update account or password, configuresureness.yml. Ignore this step without this demand.
Download and configsureness.ymlin the host directory,eg:$(pwd)/sureness.yml
Download from github/script/sureness.yml
For detail steps, please refer to Configure Account Password